
Contributing to Vapor
Contents
Contributing to Vapor#
Note
Parts of this document are derived from the xarray Contributing Guide.
Where to start?#
All contributions are welcome, and can include:
Vapor’s current to-do list can be found on our GitHub “issues” tab.
If you’ve found an interesting issue that you would like to help fix, write a comment stating that you would like to be assigned to it. Assigning issues to one or more individuals helps coordination among developers.
After assignment, you can refer to this document to set up your development environment, and then make your contribution. The purpose of this guide is to help developers understand what part of Vapor’s architecture is relevant to their assigned issue, and how to get their fix incorporated into our master branch.
Feel free to ask questions on the Vapor Discourse Forum.
Bug Reports and Feature Requests#
To submit a new bug report or feature request, you can click the “New issue” button in the upper right of our GitHub issue tracker, or by clicking on this link.
Bug reports are an important part of making Vapor more stable. A bug report should have a brief description of the problem, as well as a list of steps to reproduce the problem. See this stackoverflow article for tips on writing a good bug report.
If you’re building Vapor from its source code and find a bug, always try to reproduce your bug on the master branch.
It is also worth searching for existing bug reports and pull requests to see if the issue has already been reported and/or fixed. It’s possible that a bug may be fixed, but it has not been merged into master or incorporated into a current installer.
Code Contributions#
If you’ve found an issue you’d like to fix, you’ll need to compile Vapor, fix the issue at hand, and submit your changes for review and approval. Prerequisite software includes:
Git for Vapor’s version control
CMake (version 3.20 or higher) for Vapor’s build system
One of the following compilers, dependent on which operating system you’re using:
OSX - LLVM 10.0.1 (clang-1001.0.46.4)
Ubuntu/CentOS - g++ 7.5.0 or higher
Windows - Microsoft Visual Studio 2015, version 14
Version control, Git, and GitHub#
To a new developer, working with Git is one of the more daunting aspects of contributing to Vapor. It can very quickly become overwhelming, but sticking to the guidelines below will help keep the process straightforward and mostly trouble free. As always, if you are having difficulties please feel free to ask for help.
Vapor’s code is hosted on GitHub. To contribute you will need to sign up for a free GitHub account. We use Git for version control to allow many people to work together on the project. Git can also be acquired by package managers like apt-get (Ubuntu), yum (RedHat), and choco (Windows).
The GitHub help pages are a great place to get started with Git.
GitHub also has instructions for installing git, setting up your SSH key, and configuring Git. All these steps need to be completed before writing code for Vapor.
Forking Vapor’s code#
After installing Git and registering with GitHub, it’s time to “Fork” Vapor’s code base by clicking the Fork button on the upper right corner of Vapor’s GitHub repository. This creates your own repository on GitHub that contains a copy of Vapor’s current master branch.
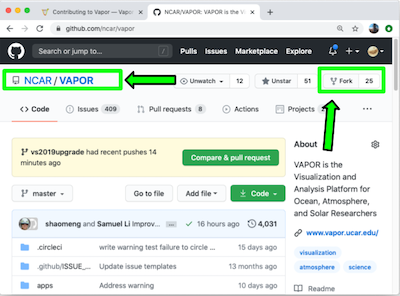
Click the “Fork” button in the top-left corner of we website.#
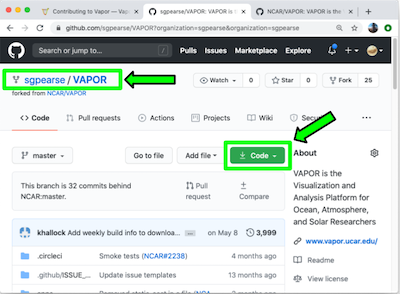
The newly created fork, based off Vapor’s master branch. Note the new repository name (sgpearse/VAPOR). This is the repository you will clone from.#
Clone your forked repository to a suitable location on your local work machine. This new remote repository is what will be merged with Vapor’s master branch once your changes have been made.
After completing your work, your changes can be submitted for review through a Pull Request from your Fork, into Vapor’s master repository. This is done under the Pull Requests tab in Vapor’s github repository. From this tab, create a new pull request that brings the changes from your forked repo into Vapor’s master repo. More details on this step are included in the Submitting Your Changes section of this document.
For more information on the Forking Workflow, please see Atlassian has a tutorial on basics and best practices.
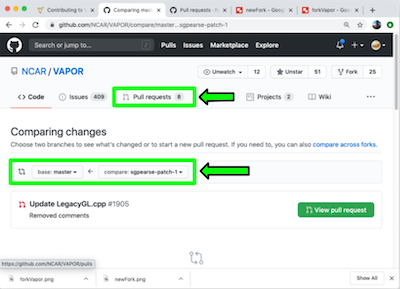
Submitting a pull request to Vapor’s master branch.#
Third-Party Libraries#
Download pre-built Third-Party Libraries (Recommended)#
This is the recommended approach for acquiring the third-party libraries that Vapor depends on. If you require additional libraries, or custom settings to the libraries currently used by vapor, see the Building Third-Party Libraries section.
After forking your new Vapor repository and cloning from it, you can download pre-built third-party libraries from the links below. Be sure to select the correct libraries for the operating system you’re building on.
Note
These libraries must be placed in the directory specified above their respective links.
Windows
Unzip the following file linked below into the root of your C:\ directory.
Linux and OSX
If building on Linux or OSX, the third party libraries must be placed in /usr/local/VAPOR-Deps/.
Building Third-Party Libraries (Not recommended)#
This is an alternative to downloading our pre-built libraries that allows you to configure and store them wherever you want. This is a more complex exercise. If you choose to do this, you must also configure Vapor’s CMake configuration to point to your custom directory.
If you wish to go down this route, you may follow the build instructions for Windows and UNIX.
The source code for these libraries may be downloaded here.
Note
The file <vapor-source>/site_files/site.NCAR may be used to specifiy the location of the libraries. To do this, build your version of the libraries in /usr/local/VAPOR-Deps/2019-Aug, or change the THIRD_PARTY_LIB_DIR path in site.NCAR.
Note
On OSX, a “quarantine” flag will be added to the binaries and libraries you build from source. This will prevent them from being run. To remove the flag, run sudo xattr -dr com.apple.quarantine /usr/local/VAPOR-Deps/2019-Aug after building the libraries.
Vapor 3 was built with the following third party library configuration. |
|
Library |
Version |
assimp |
4.1.0 |
freetype |
2.10.1 |
glew |
2.1.0 |
glm |
0.9.9.8 |
hdf5 |
1.12.2 |
hdf5 plugins |
1.12.2 |
jpeg |
9c |
libgeotiff |
1.7.1 |
udunits |
2.2.26 |
netCDF |
4.8.1 |
tiff |
4.0.10 |
proj |
6.1.1 |
python |
3.6.9 (3.9.14 on Ubuntu 22) |
Qt |
5.13.2 (5.15.4 on Ubuntu 22) |
Ospray |
2.10.0 |
Install System Libraries#
Building Vapor from source requires system libraries that are not natively available on all UNIX platforms. The following commands can be used to acquire these libraries.
- Ubuntu:
sudo apt-get install git freeglut3-dev libexpat1-dev libglib2.0-0 libdbus1-3
- CentOS:
sudo yum install dbus make freeglut-devel expat-devel libquadmath-devel libXrender-devel libSM-devel fontconfig-devel
Note
Vapor uses docker images as a basis for its continuous integration test suite, which are built from Dockerfiles located in <source-directory>/share/docker. The docker files in this directory can be used as a reference to how our different test systems build Vapor.
Building Vapor from source#
On all operating systems, create a directory where the build will take place. One option is to put the build directory inside of the Vapor source code directory.
> cd VAPOR > mkdir build > cd build
- Windows
Enter your build directory as the “Where to build the binaries” field in the CMake GUI. Click Configure, Generate, and then Open Project in that order. Visual Studio will open, and you can build the target PACKAGE to compile the source code.
- UNIX:
Navigate to your build directory and run the command cmake <source_directory>, where <source_directory> is the root directory of Vapor’s source code. If the configuration was successful, you can then run make to compile Vapor.
cmake .. && make
Note
Some libraries have been optimized with the optional OpenMP API. If you wish to compile with these optimizations, you’ll need a compiler that supports OpenMP, as well as a few compiler flags which are documented here.
If compilation is successful, you can find Vapor’s executable in the bin directory within your build directory.
Some users may want their build to target a different library than what is distributed with Vapor’s 3rd party library bundle. Different libraries can be targetted in two ways, 1) through the ccmake tool, and 2) by editing the file located in <source-directory>/site_files/site.NCAR.
Cmake provides an interface to set build variables called ccmake. From your build directory, you can issue the ccmake command, followed by the path to Vapor’s source code. If your build directory is in <source_directory>/build, issuing ccmake from this directory would look like this:
ccmake ..
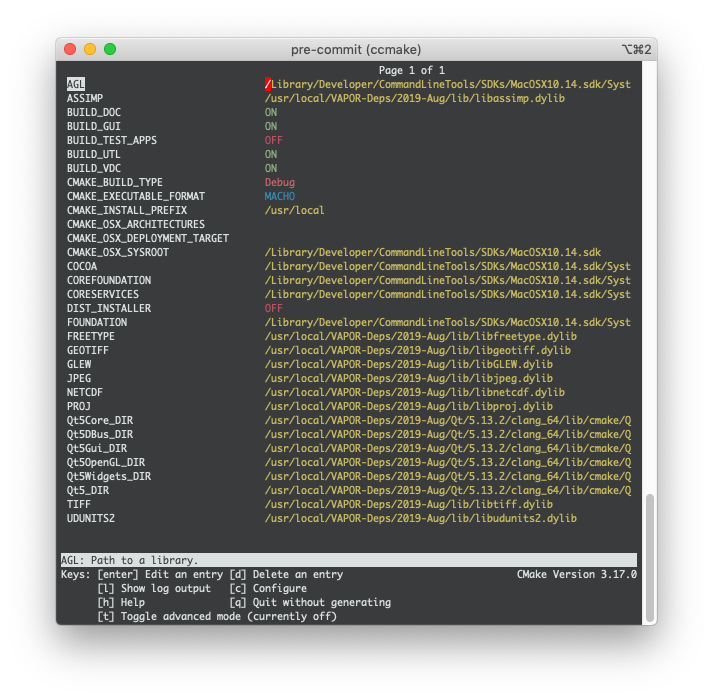
ccmake’s interface for changing build variables after issuing “ccmake ..” on Vapor’s source directory. This is assuming your build directory is in <vapor_source>/build.#
The above interface allows you to set targets for some (but not all) of Vapor’s libraries. More information on ccmake can be found here. Your changes will be saved in your build directory in a file named CMakeLists.txt. If this file gets deleted, your changes will be lost. To set your libraries in a more permanent fashion, you can edit the site.NCAR file, described below.
The site.NCAR file is what is used by the Vapor team to define what third party libraries a build should link to. This file is located at <vapor_source>/site_files/site.NCAR, and contains conditionals for buildong on Darwin (OSX), Windows, and Linux (Ubuntu/CentOS). There are also conditionals for building on NCAR’s visualization cluster, Casper.
The THIRD_PARTY_DIR variable in this file may be overloaded to re-target the location of Vapor’s libraries. Special values exist for the Qt and Python libraries becasuse they are built outside of the THIRD_PARTY_DIR, and must be manually overridden. These variables are:
QTDIR |
Directory where the Qt library has been built/installed |
Qt5Core_DIR |
Directory where the Qt5Core shared library was built/installed |
QT_QMAKE_EXECUTABLE |
Location of Qt’s QMake executable |
PYTHONDIR |
Directory containing Python’s libraries and headers |
PYTHONPATH |
Directory containing Python’s site packages |
PYTHONVERSION |
Version of Python |
NUMPY_INCLUDE_DIR |
Directory containing numpy’s header files |
OSPRAYDIR |
Directory containing Ospray’s librarieses |
Adding to the Code Base#
After successfully compiling Vapor, you can make changes to the code base. Make sure to follow Vapor’s Code Conventions. If building on a UNIX system, eliminate all compiler warnings.
What pieces of code you add or modify will depend on the issue you’re trying to fix. Most often, contributors will be doing one of two things:
Build and Test an Installer#
Before submitting your changes for review, it’s worth the time to build an installer to see if libraries are properly linked, and optimized code works correctly.
To build an installer, run ccmake <vapor-source-dir> so that the field CMAKE_BUILD_TYPE Debug is changed to CMAKE_BUILD_TYPE Release. Also change the field DIST_INSTALLER OFF to be DIST_INSTALLER ON. Alternatively to ccmake, you can hand-edit the file CMakeLists.txt, which is located in the root of Vapor’s source directory.
On Windows, make sure that the Visual Studio setting for the build is in Release mode, not Debug, and build the target PACKAGE.
On OSX, run cmake <vapor-source-dir> && make && make installer from your build directory.
On Linux, run cmake <vapor-source-dir> && make linuxpreinstall && make installer from your build directory.
Submitting Your Changes#
After your implementation is complete, push your commits to your forked repository on GitHub. Then issue a pull request to Vapor’s main branch.
- Manual Review:
If these tests pass, Vapor’s team will review the Pull Request to make sure that Vapor’s Code Conventions were honored, and that the logic and structure of the code is sound.
After review, further changes may be requested. If everything looks good, the Pull Request will be merged into Vapor’s master repository.
Vapor Coding Conventions#
Building Vapor’s Python API from source#
To build Vapor’s Python API from source, you will need to install either Anaconda or Miniconda onto your system. Download here. Once installed, fork Vapor’s github repository then build and install the .tar.bz2 package by following the steps below.
Building the conda image#
These steps generate a .tar.bz2 bundle that you can locally install with conda, instead of fetching a package from a remote repository like conda-forge.
After cloning Vapor, installing Anaconda/Miniconda, and modifying source code if needed, cd into the /conda directory:
cd ~/VAPOR/conda
Install the conda-build package on your current Anaconda/Miniconda installation:
conda install conda-build
Install the conda-forge channel, which Anaconda/Miniconda will use to gather libraries for your build:
conda config --add channels conda-forge
Execute the conda build command on your current code base:
conda build .
Note: If you get a build error referencing CMakeLists.txt at this point, delete everything in your VAPOR/build directory and try re-running the above command.
Alternatively, add cmake build flags to your conda build such as the following:
DEBUG_BUILD=false MAP_IMAGES_PATH="<path_to_images>" conda build .
If the build is successful a conda package file will be created. The path to the file will be created at the end of the “conda build” step, and will look something like:
$CONDA_PREFIX/conda-bld/osx-64/vapor-3.6.0-ha5a8b8e_0.tar.bz2
Note
$CONDA_PREFIX is an environment variable that points to your conda installation path.
Installing the conda image#
Once you’ve built a .tar.bz2 conda image for your customized version of Vapor, follow these steps to install it:
Create a local conda channel on your computer that will host your new .tar.bz file for installation. Note - If you’re on OSX, name your directory osx-64, or if you’re on linux, name it linux-64.
mkdir -p ~/channel/osx-64
or
mkdir -p ~/channel/linux-64
Move your created .tar.bz2 package from its initial directory into your channel
mv ~/tmp/miniconda/envs/xarray/conda-bld/osx-64/vapor-3.6.0-ha5a8b8e_0.tar.bz2 ~/channel/osx-64
or
mv ~/tmp/miniconda/envs/xarray/conda-bld/linux-64/vapor-3.6.0-ha5a8b8e_0.tar.bz2 ~/channel/linux-64
Index your new channel, so conda knows about it:
conda index ~/channel
Create a new conda environment to install Vapor onto, or select a pre-existing environment:
conda create --name vapor
conda activate vapor
or
conda activate myEnvironment
Finally install the custon .tar.bz2 package:
conda install -c file://<pathToYourChannel> vapor
Note: It may be necessary to re-run conda config –add channels conda-forge at this step.
Verify that your new installation works:
python
import vapor
Example python scripts and jupyter notebooks can be found in $CONDA_PREFIX/lib/python3.<version>/site-packages/vapor
Contributing to Vapor’s Documentation#
Vapor uses the Sphinx documentation generator.
To contribute to Vapor’s documentation, follow the three steps below. Python version 3.7 or higher is required.
Install the following requirements. There is more than one way to do this, and
pipis one recommendation.
python -m pip install sphinx
python -m pip install sphinx_rtd_theme
python -m pip install sphinx_gallery
python -m pip install xarray
python -m pip install numpy
python -m pip install matplotlib
Checkout Vapor’s
readTheDocsbranch, then enter thedocsdirectory.
cd ~/VAPOR
git checkout readTheDocs
cd docs
Explore Vapor’s documentation by reading and editing the .rst files in this directory, then build the documentation
make html
The documentation .html files will be written in the html directory (ie. ~/VAPOR/docs/html) for viewing in a web browser.
Contributing to Vapor’s Gallery#
Contributing to Vapor’s visualiation gallery helps us understand how the application is being used, and can drive future requirements. If you’d like to share your visualizations with us, you can submit them to our gallery by filling out the following form: