
Getting Started on the CISL Cloud#
Warning
This project is still in a pre-production stage and user data stored on our services is not guaranteed. Please utilize code repositories such as GitHub and production storage systems such as GLADE, Stratus, or a public cloud option. This ensures your work is backed up while making it easier to reproduce it quickly in different environments.
The CISL Cloud is built on a container management platform known as Kubernetes(K8s). RKE2 is used to deploy K8s on servers running AlmaLinux. Microservices are utilized to provide a tool set that streamlines common tasks. Examples of common tasks that are eliminated due to these microservices are creating DNS records, assigning TLS certificates, configuring a reverse proxy, load balancing applications, scaling resources, mounting shared volumes, and providing a self healing environment that is highly available.
Documentation#
This documentation site is meant to include all information you may need to navigate the CISL cloud and the resources hosted on it. If you find anything that is not clear or missing please submit an issue to our GitHub repository via the open issue link that appears when you hover over the GitHub icon at the top of the page. The Report Issue link in the navbar opens a Jira ticket that also can be used to communicate a request for enhancing content.
This Getting Started guide will provide a high level introduction in to each resource. More in depth details on each resource can be found on this Documentation page.
Getting Help#
There are links in the Navigation bar at the top of the screen for NEW REQUEST and REPORT ISSUE that will open a form to create a new request or bug report respectively. More information on how to fill out the forms can be found at this link on creating tickets. If you encounter issues please feel free to contact the teams Product Owner, Nick Cote, directly.
Hosting#
Hosting containerized applications is made easy with Kubernetes. Shared services are utilized to provide complex system configurations with lines of text in yaml files. Provide unique values for the application, including a URL, and K8s will provision a HTTPS endpoint for the application with valid, auto renewing, certificates. A central storage orchestrator provides persistent volumes and access to mount other file systems. More details can be found at this link to the K8s architecture documentation.
Creating a Container Image#
There are a number of different frameworks when it comes to running a web application. Whether it’s a Python based application like Flask, Django, FastAPI, Bokeh, Panel, or HTML, JavaScript, running a containerized version of your application opens up the ability to run it easily in a variety of places. The following guide assumes that you are already familiar with creating applications with some of the web frameworks listed above.
If you are able to run your application locally and access via a web browser, via http://localhost:5001 or http://127.0.0.1:5001 for instance, it shouldn’t be too hard to create a container image for your application. Regardless of whether you use Docker, Podman, or something else, the first place to start when containerizing an application is to create a set of instructions on how to build your application in a file known as a Dockerfile. The instructions are going to vary based on the requirements of the application being built so it’s difficult to provide an example that covers everything required for your specific application. There are a set of examples provided at this link on containerizing a python app. It will walk you through creating a basic Dockerfile, building that image locally, and finally testing it by running it locally as well. If you need any help containerizing a specific application please reach out to the team at the following email link.
Hosting your Container on K8s#
Now that you have a working container image of your application that you’ve tested locally and confirmed it works it’s ready to be hosted on our K8s platform. This is accomplished by creating a collection of yaml files known as Helm charts to deploy and manage our K8s applications. We have a few different Helm templates that can be used to create your own Helm chart for your applications and requirements. As of right now we have the following templates in GitHub:
In all those examples the only files you need to concern yourself with to start are the values.yaml & Chart.yaml files. Chart.yaml mostly just tracks the version of your application and provides a little description and details of what it actually is. The values.yaml file is where you provide the image to use, resources required, port to connect to, and names to use. The K8s cluster has services configured to assign your application a hostname, create a resolvable FQDN to browse to, and a TLS certificate to secure the application via HTTPS.
Note
As of right now we only can host applications on the internal UCAR network on the *.k8s.ucar.edu domain. We are actively working on public access and will provide an update when this functionality is live. Switching your application from internal to external network access is like flipping a switch so don’t wait for external access to make sure your application works properly.
Utilizing CI/CD#

Once the initial Dockerfile and Helm chart has been created it’s possible to setup a full CI/CD workflow to deploy your application when new changes are pushed to GitHub. A tool called Argo CD is utilized to automatically sync any changes made to the Helm chart in your GitHub repository to K8s and more information on Argo CD can be found at this link to the Argo CD documentation. The Cloud team will have to be engaged to help you setup the Argo CD piece initially. Follow this link to instructions on creating a ticket for the team to assist you with Argo CD. We will also make sure your application deploys correctly as part of the initial deployment. GitHub actions is then utilized to run jobs that will create a new container image for your application, push that to a container registry, and update the values.yaml & Chart.yaml files. Now when changes are pushed to your GitHub repository a GitHub workflow is kicked off that will update your application image, update the Helm chart, Argo CD will see the change to the Helm chart, and then it will sync it automatically. Your application is now utilizing a full CI/CD workflow to deploy changes. You can also set this up to deploy a development version of your application to test changes before merging the changes to the main branch and updating the production version of your application.
kubectl Access#
A kubeconfig file is available if kubectl, or Helm, access to resources is required. The CISL On-Premise Cloud utilizes Rancher as an open source container management platform built. Access provided to general users is limited with Role Based Access Controls (RBAC) and operations can only be run against objects inside the project and namespaces configured for their resources. More information on getting a kubeconfig file can be found in the Administrators guide at this link to the Rancher documentation. Access to Rancher, and the kubeconfig file, will require a ticket to be opened with the CISL Cloud Team by utilizing the New Request link at the top of the page.
Note
Permissions are restricted. Access to Custom Resource Definitions (CRDs) are not available and this will prevent you from installing anything that requires it’s own API server as part of the installation. JupyterHub for instance requires a custom CRD and general users are not able to deploy it on their own. More details on the JupyterHub provided by the CISL Cloud Team can be found below. If you hit a permissions issue that is blocking your work please submit a ticket to the Cloud Team.
Data Access & File Sharing#
GLADE#
Read Only access is provided to GLADE campaign and collections. This is mounted inside all Jupyter environments launched on our JupyterHub on the path /glade/campaign & /glade/collections. Read Only access to these mounts can also be provided to containerized applications like Web Visualizations and is described in more detail in that section.
Stratus#

Note
The videos on this page require you to be logged in to YouTube with your UCAR email address. They are only available to UCAR employees. If there is a message stating the videos are private please log in to YouTube with you UCAR email address and reload the page.
Request Access#
CISL has an object storage platform known as Stratus that can be used to store and read objects. Getting an Access ID and a Secret Key can be done by following this link to the instructions. Buckets can also be configured to allow anonymous users read access so data can be read without keys.
JupyterHub S3 Extension#
There is a S3 Object Storage Browser extension installed in the JupyterHub instance. Directions on how to utilize that extension can be found at this link to the Jupyter S3 Extension documentation. The Object Browser really only lets you browse the contents of buckets tied to the Access ID provided.
Python Examples#
In order to upload and download objects it’s sometimes more convenient to use a python module such as boto3 or isd_s3. If you’d like help getting started with either module a good starting place can be found at this link to S3 Python Examples.
Container Registry#

We utilize Harbor to provide a local container registry that takes advantage of high speed networks. For more information, see Image Management.
Harbor also includes Trivy, an image scanner that provides reports on any vulnerabilities an image contains. The information returned in the vulnerability reports can be used to patch software and eliminate security flaws contained in images. For more information, see Scan Image for Vulnerabilities.
Credentials to Access Harbor will be your CIT sso username and password. There is no need to specify a domain.
Note
Access to Harbor is controlled with an LDAP group. If you are denied access you are most likely not a member of that group. Please use this link to submit a ticket and specify you want access to Harbor.
Harbor can also be used as a proxy to pull and then host images directly from docker.io, quay.io, ghcr.io, and registry.k8s.io. An example command of how you would pull the hello-world image hosted on Docker hub through Harbor can be seen below:
docker pull hub.k8s.ucar.edu/docker/library/hello-world:latest
If that image is already stored on Harbor it will be pulled directly from Harbor. If it is not it will be proxied through Harbor and then stored for future use. The Trivy scanner can then be used to evaluate vulnerabilities on images pulled through the Harbor Proxy.
JupyterHub#
The CISL On-prem Cloud provides a JupyterHub for a customizable Virtual Development Environment with access to GLADE, GPUs, and parallel processing with Dask Gateway.
Authentication#
Authentication to our JupyterHub is currently controlled via GitHub Teams. Information on how to join the GitHub team can be found at this how-to request access link.
Notebook/Server Options#
The JupyterHub uses custom notebook images controlled and maintained by the Cloud team. After logging in you will be redirected a page titled Server Options. This is the startup page where you get to chose what resources you want to utilize. We provide a CPU image and two GPU images that can be selected after logging in. All the images provide the same extensions and are setup to provide a cohesive experience while switching between images. The users home directory, /home/jovyan for all users, is persistent and retains anything written to it.
CPU Image#
The CPU image is named NSF NCAR CPU Notebook and has 3 different resource options for Memory and CPU that can be selected from the dropdown.
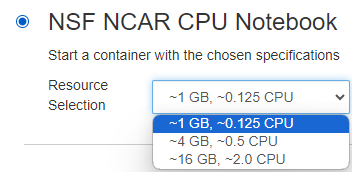
By default the CPU image contains 3 prebuilt conda environments, 2 Python and 1 R, that contain a lot of packages typically required to do scientific analysis. These environments are named:
cisl-cloud-base
npl-2023b
r-4.3
More details on what are included in these packages can be found at this link to the base conda environments documentation.
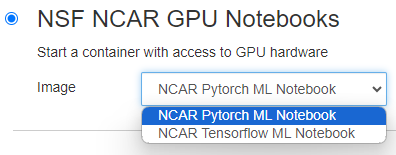
GPU Images#
Two different GPU images are offered. One is built around the Tensorflow Python package, the other is built around PyTorch.
The GPU images have all the same custom configurations as the CPU image. They contain only 1 custom conda environment by default named:
cisl-gpu-base
It contains a lot of the same base packages from the cisl-cloud-base environment, but adds in the required GPU packages.
Note
The next 2 examples use code that can be cloned from the following repository : NicholasCote/CISL-CCPP-Tutorial
Git Extension#
The best place to start is to get some code in to the notebook in order to run through real life scenarios. Our custom image includes a Git extension that can be used to interact with Git repositories via a UI instead of using only the command line.
Custom Conda Kernels#
The custom images all use a python module called nb_conda_kernels that allows any conda environment containing ipykernel to be registered as a Jupyter kernel automatically.
Dask Gateway#
Dask Gateway can be utilized to provide parallel processing capabilities for Notebooks. More information can be found at this link to documentation on utilizing Dask Gateway
Binder#
Binder is a tool that enables sharing of custom computing environments from code repository contents by utilizing containers. There is an instance of Binder, and an associated BinderHub, that can be accessed via the link present in the Resources dropdown at the top of this documentation.