Once a sounding has been processed by Aspen, the results must be examined carefully. Frequently some parameters will need to be adjusted to compensate for characteristics of the data.
Remember to press the Recompute button after making post-processing adjustments.
End of data
In a well-behaved sounding, the end of the raw data set will occur at the end of the sounding. For a dropsonde landing in water, this is the usual case. For a dropsonde hitting the earth, or with upsondes, the raw data can contain observations that should not be included in the processed sounding. The user must then manually specify the end of the drop by setting the end of drop time on the Main tab. It is critical that the end of drop be correctly set for dropsonde soundings.

The Raw data table and the XY graph are useful for determining the end time. Scroll to the bottom of the raw data to view the values of individual data points. On the XY graph, enable the raw data trace, and use the mouse to zoom in the area of the sounding end. Data point markers and grids can be enabled with buttons above the graph.
The Raw tab will continue to display all data from the sonde, including data after the selected end-of-drop time. The QC tab will only show data points that are within the end of data time period.
Dropsonde heights and the surface
For dropsonde soundings, the height calculations are the trickiest part of the Aspen analysis. If the drop terminated cleanly at a known altitude, upward integration of the heights is straightforward. Upward integration is impossible, however, if the dropsonde termination altitude is unknown. This can occur if the drop did not make it all of the way to the surface, or if the termination point on land had an unknown altitude.
In the latter situations, the sounding heights can be computed by downward integration from the launch altitude. Note that this is suitable only if the launch altitude is known with accuracy. Usually the launch altitude is provided by the aircraft data system, and it is critical to determine the accuracy of this altitude. If altitude is provided by a radar altimeter over the ocean, it is probably acceptable. If it is provided by a pressure-based altimeter, at some time or distance since the altimeter setting was applied, the aircraft-provided altitude is probably not acceptable.
The Main tab has several items that relate to the height calculations.
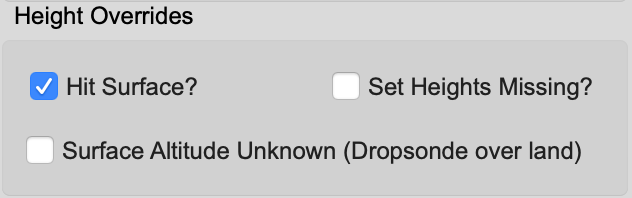
In the box labeled “Height Overrides” there are check buttons that have the following effects:
- Hit Surface – The default case. Check this box if the dropsonde hit the surface. The heights will be integrated up from the surface altitude. Uncheck this box if the sonde did not hit surface (i.e. stopped transmitting early) to avoid creating surface levels in WMO outputs.
- Unknown Surface Altitude – Check this box if the surface altitude is unknown, such as when a dropsonde has terminated on land. The heights will be integrated down from the launch altitude, and the surface altitude will be taken from downward integration.
- Set Heights Unknown – Check this box if you feel the heights are not sufficiently accurate, no matter which way they are calculated. The heights will not be calculated or used in latter processing.
At the lower right of the Main tab is a box displaying the results of the upward and downward height integrations.
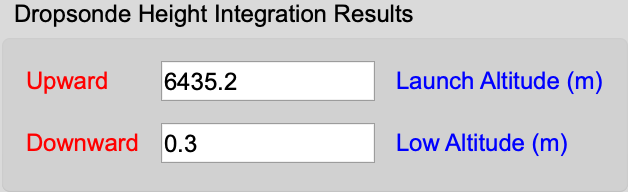
This is shown for diagnostic purposes. If downward integration leads to a launch altitude close to the surface altitude and, likewise, the upward integration is close to the launch altitude, then there is confidence in the launch altitude. If there are significant discrepancies, the launch altitude is probably incorrect. Additionally, differences in the diagnostics can signify a large systematic error in the variables used in the height integration, i.e. pressure, temperature or humidity.
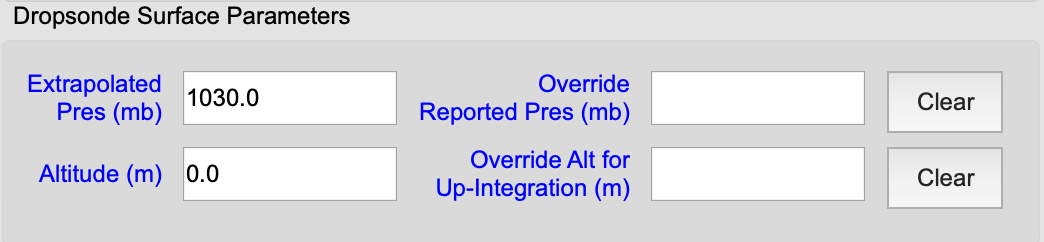
If the surface altitude can be determined for a launch which terminated on land, this value can be entered into the surface altitude override box, so that the upward integration can be computed.
The final item affecting the height calculation is the Launch Altitude entry in the Launch Parameters box in the upper left of the Main tab. If another source of the launch altitude is available, it may be entered here in order to override the aircraft supplied value. The Clear button can be used to remove the override.
It should be pointed out that the heights are mainly relevant to the coding of the WMO messages, where they are used to report the altitudes of standard pressure surfaces. Even if the heights are unusable, the WMO message will still contain a very accurate report of the sounding based on pressure. The upshot is to set heights to missing when in doubt, rather than report erroneous values.
Dropsonde end of series adjustments
Some environments show extreme vertical gradients near the surface. Soundings taken through the hurricane eyewall are a classic examples of this. Sometimes it is desirable to preserve the high-resolution detail in this part of the sounding, especially for near surface winds, as these data are critical to hurricane evaluation and planning.
The standard smoothing in Aspen is usually specified in order to smooth out some of the variance so that an inappropriate number of levels are not created. But this also removes the desired detail at the bottom of the sounding. In order to alleviate this, Aspen creates an additional filtered copy of the pressure and winds series, and proportionally blends these series back into the main series at the bottom of the sounding. The blending span is specified by the BlendLength configuration parameter. BlendLength is also used as the wavelength of the secondary filter.
Launch parameters
The launch parameters are the surface or aircraft flight level observation made at the time of launch. They become either the bottom or top point in the sounding, depending on the sounding direction. The QC procedures assume that these launch observations are accurate, so they will not be changed. If the launch observations do need to be modified, the Launch Parameters box in the upper left of the Main tab has entries that allow the user to override or ignore them.
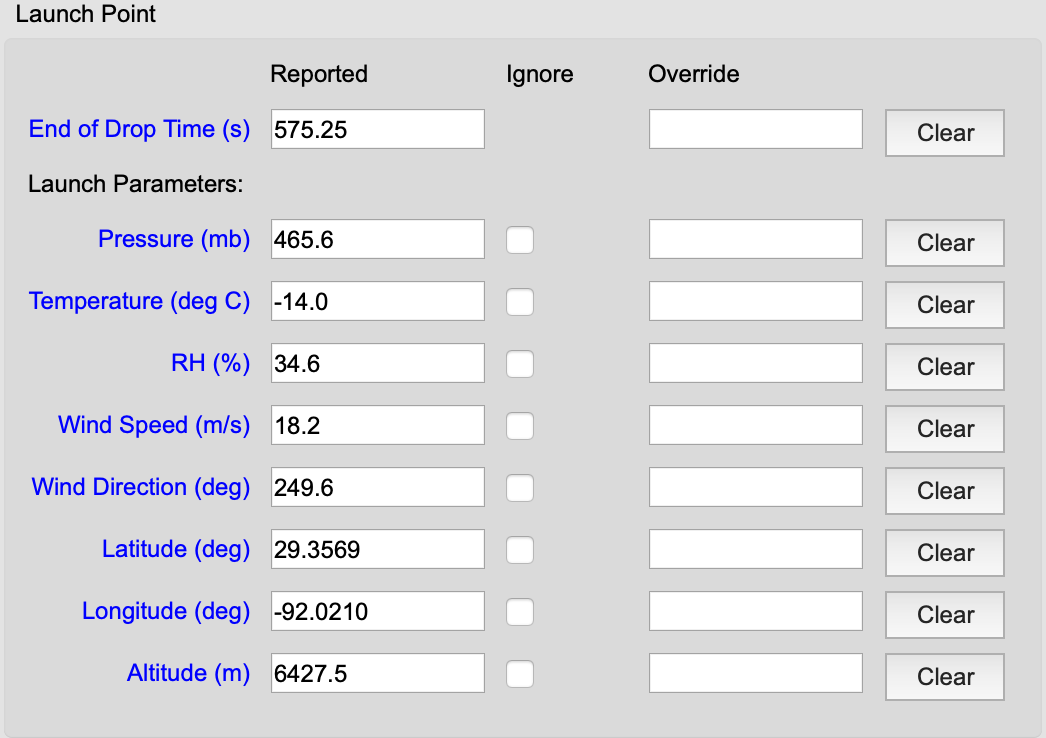
Select ignore to remove existing launch point values or use the override boxes to replace them. Use the Clear button to revert to the original values.
Setting the QC parameters
The QC parameters, which control the operation of the various QC algorithms, can be modified by the user. However, only experienced users who understand the effects of the parameters should do this. See the Quality Control Procedures section for a complete description.
The QC parameters are organized in named sets, with one of them designated as the currently active set. The parameters in the active set are the ones used for succeeding analyses by Aspen. The active set name is displayed on the right side of the status bar at the bottom of the Aspen application window. It is visible for every Aspen tab:

The initial installation of Aspen provides a configuration set named “editsonde”, and designates it as active. These parameters are generally useful for dropsonde soundings in a tropical environment. Aspen also supplies other config sets for use with upsondes and different kinds of dropsondes. It is also possible to create a new config set to address specific data considerations.
See the Configuration section for directions on setting the active set and maintaining or creating configuration sets.
The user should be in the habit of always checking the status bar to verify that the correct configuration set is designated as active.
Edit meTo change the choice of active configuration set, close all sounding files within Aspen. The file menu will now have a “Configuration…” entry that allows access to the configuration editor.