2: Test case: changing the chemistry#
Create, configure, build a new case as done in exercise 1, for one of these following configurations:
CAM-chem:
f.e30.FHISTC_LTt1s.ne16pg3_mg17.tutorial.test2with theFHISTC_LTt1scompset; orWACCM:
f.e30.FHISTC_WAt1ma.ne16pg3_mg17.tutorial.test2with theFHISTC_WAt1macompset.
Set up this simulation to run for 5 days, with daily instantaneous output of the variables: ‘PS’,’Z3’,’T’,’U’,’V’,’O3’.
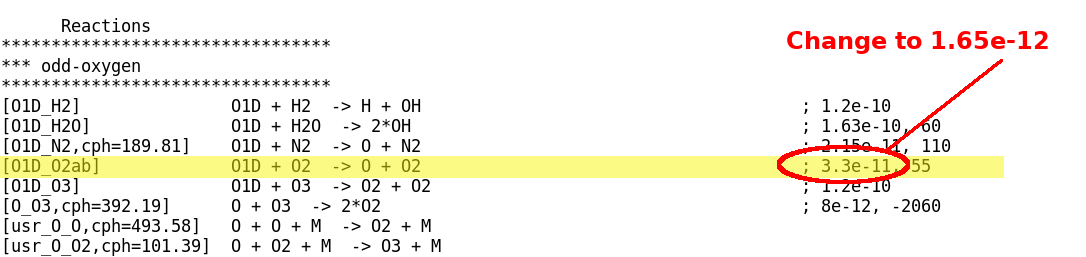
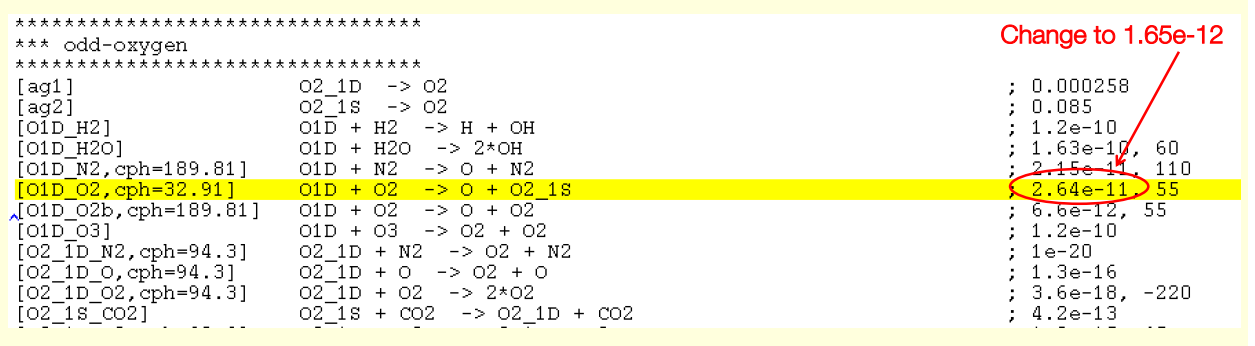
To change the chemistry, copy your chemistry preprocessor file chem_mech.in from CaseDocs to your case directory as my_chem_mech.in and change reaction rate for the O1D reaction with O2 to 1.65e-12. Point the simulation to your new mechanism file using CAM_CONFIG_OPTS and re-build and submit. Once the simulation is complete, compare the 5th day output to the results from exercise 1.
Extra information:
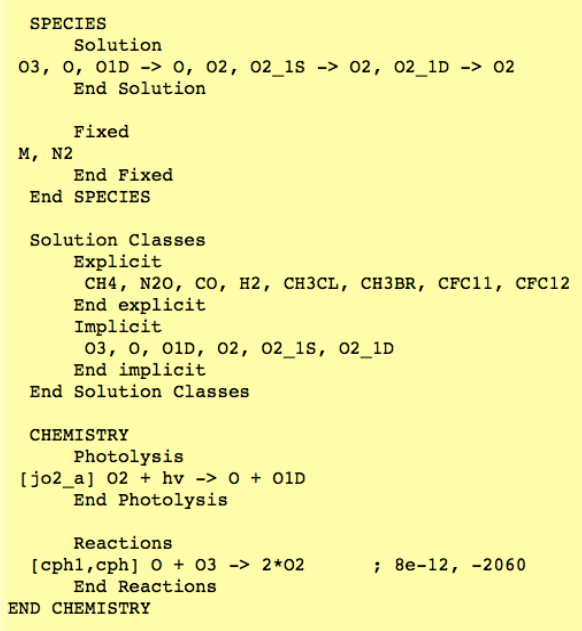
The chemistry preprocessor generates CAM Fortran source code to solve chemistry. The input is an ASCII file listing chemical reactions and rates. The chemistry preprocessor input file used in your previous run is in your
$CASEROOT/CaseDocs/chem_mech.in
An example of a simple chemistry mechanism file content can be seen below:
Additional input files for default chemical mechanisms are in each source code subdirectory for mechanisms under:
$SRCROOT/components/cam/src/chemistry/pp_*
(i.e. pp_waccm_tsmlt_mam5). You do not need to change these additional files for this exercise.
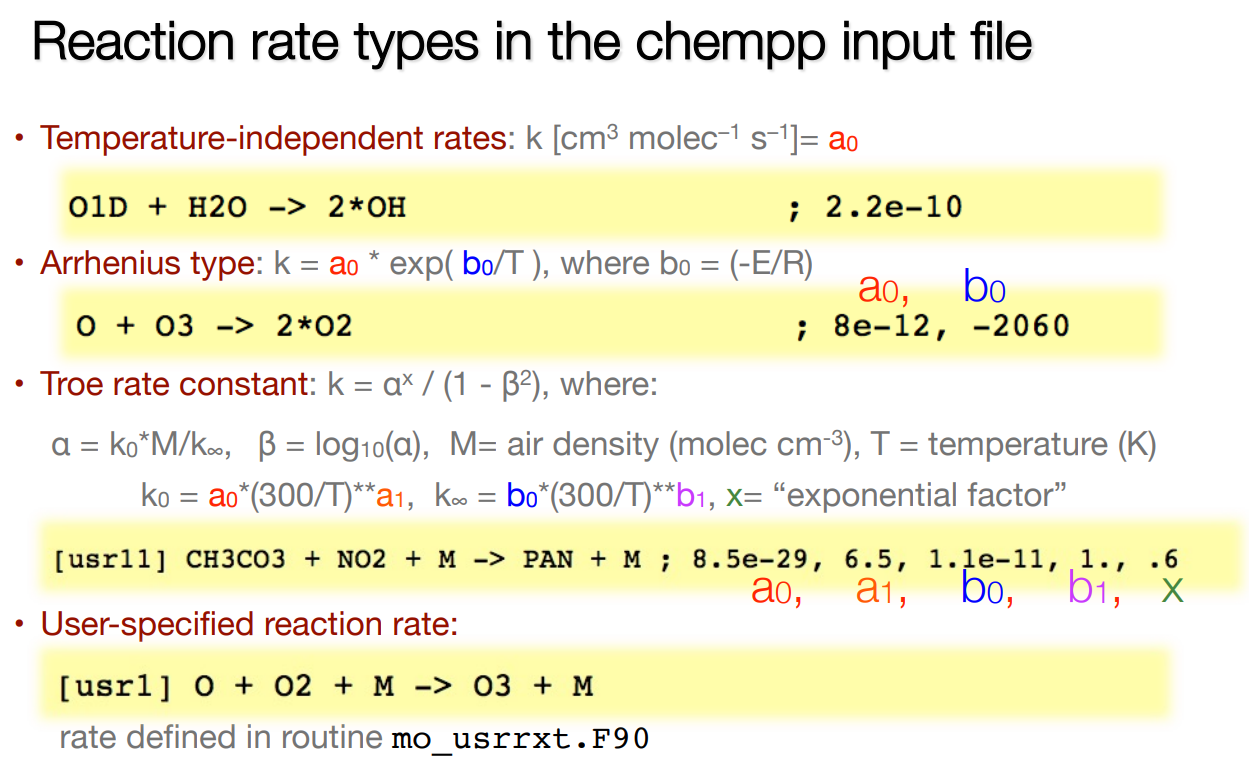
Below is an overview of the different types of reactions and rates that can be defined in the mechanism file.
Click here for hints
Creating a new chemistry input file
less CaseDocs/chem_mech.in
cp CaseDocs/chem_mech.in my_chem_mech.in
Open your copied new chemistry mechanism file with a text editor and change the reaction rate:
How to tell CESM to read your new chemistry mechanism file
First look at the
CAM_CONFIG_OPTSdefault setting for CAM-chem
./xmlquery CAM_CONFIG_OPTS
CAM_CONFIG_OPTS: -phys cam6 -chem trop_strat_mam4_t1s1 -age_of_air_trcs
(note this will be different for WACCM)Use xmlchange to append a pointer to your user mechanism:
./xmlchange --append CAM_CONFIG_OPTS="--usr_mech_infile `pwd`/my_chem_mech.in"Check the
CAM_CONFIG_OPTShas been changed
./xmlquery CAM_CONFIG_OPTS
CAM_CONFIG_OPTS: -phys cam6 -chem trop_strat_mam4_t1s1 -age_of_air_trcs --usr_mech_infile /glade/u/home/$USER/cases/$CASENAME/my_chem_mech.inWhen an important xml variable like CAM_CONFIG_OPTS is changed, resetting the setup is needed. You will need to reset the case setup, and rebuild before submitting. (Note that in general, you only need to reset or clean build when a message shows up in the command prompt stating to reset or clean build).
Click here for the solution
# Set environment variables
Use the commands
for CAM-chem
set CASENAME = f.e30.FHISTC_LTt1s.ne16pg3_mg17.tutorial.test2
set CASEDIR = /glade/u/home/$USER/cases/$CASENAME
set RUNDIR = /glade/derecho/scratch/$USER/$CASENAME/run
set COMPSET = FHISTC_LTt1s
set RESOLUTION = ne16pg3_ne16pg3_mg17
or for WACCM
set CASENAME = f.e30.FHISTC_WAt1ma.ne16pg3_mg17.tutorial.test2
set CASEDIR = /glade/u/home/$USER/cases/$CASENAME
set RUNDIR = /glade/derecho/scratch/$USER/$CASENAME/run
set COMPSET = FHISTC_WAt1ma
set RESOLUTION = ne16pg3_ne16pg3_mg17
# Create a new case
Create a new case with the command create_newcase:
cd /glade/u/home/$USER/code/my_cesm_code/cime/scripts/
./create_newcase --case $CASEDIR --res $RESOLUTION --compset $COMPSET --run-unsupported
You may need to add --project "UESM0016" when creating a new case.
# Change the job queue and account number
If needed, change job queue and account number.
For instance, to run in the queue tutorial and the project number UESM0016
cd $CASEDIR
./xmlchange JOB_QUEUE=tutorial,PROJECT=UESM0016 --force
This step can be redone at anytime in the process.
# Setup
From within the case directory, invoke case.setup with the command:
cd $CASEDIR
./case.setup
# Build
Perform an initial build within the case directory
qcmd -- ./case.build
namelists (atm_in, ice_in, lnd_in, docn_in) will appear in the CaseDocs
subdirectory, as well as in your $rundir
# Customize namelists
As before, edit the file user_nl_cam. First open the CaseDocs/atm_in and find the lines for avgflag_pertap, mfilt, nhtfrq and copy and paste them into user_nl_cam. Then make changes to those lines in user_nl_cam and add a line to write out a second history file, fincl2. The namelist lines should look something like:
&cam_history_nl
 avgflag_pertape = 'A','I'
 mfilt          = 1,30
 nhtfrq         = 0,-24
 interpolate_output  =  .true., .true.
 interpolate_nlat    =     91,     91
 interpolate_nlon    =     180,     180

 fincl2         = 'PS','Z3','T','U','V','O3'
/
You can do this with a text editor.
You build the namelists with the command:
./preview_namelists
This step is optional as the script preview_namelists is automatically called by case.build and case.submit. But it is nice to check that your changes made their way into:
$CASEDIR/CaseDocs/atm_in
# Change the chemistry
Copy the default mechanism to your own user defined file
cp CaseDocs/chem_mech.in my_chem_mech.in
Open your mechanism file with a text editor (e.g. nedit) and change the reaction rate for O1D with O2
nedit my_chem_mech.in &
In CAM-chem
In WACCM:
Append a pointer in the to the user mechanism:
./xmlchange --append CAM_CONFIG_OPTS="--usr_mech_infile `pwd`/my_chem_mech.in"
# Re-build the model
./case.setup --reset
./case.build --clean
qcmd -- ./case.build
# Set run length
If needed, change the run length. If you want to run 5 days, you don’t have to do this, as 5 days is the default.
./xmlchange STOP_N=5,STOP_OPTION=ndays
# Submit:
./case.submit
# Check your solution
When the run is completed, look at the run files and history files.
(1) Find your model output in your run directory ($run_dir) after finished:
ls /glade/derecho/scratch/$USER/$CASENAME/run
(2) Check that your archive directory on derecho (the path will be different on other machines):
cd /glade/derecho/scratch/$USER/archive/$CASENAME/atm/hist
ls
As your run is only 5-day, there should be no monthly file (h0)
(3) Look at the contents of the h1 files using ncdump.
ncdump –h f.e30.FHISTC_LTt1s.ne16pg3_mg17.tutorial.test2.cam.h1i.1979-01-02-00000.nc